



CAUTION AND INSIGHT…

THIS ARTICLE IS OFFERED TO YOU
We are pleased to offer you this exclusive BRIDGERAMA+ post.
You pick up the following hand as West (None Vul):
♠ J97542
♥ 52
♦ A73
♣ AQ
The auction starts as follows:
| W | N | E | S |
|---|---|---|---|
| 1NT | |||
| Pass | 2♣ | ? |
It’s your turn… Are you going to pass or intervene?
Your meager arguments for making a call:
- You hold a six-card suit and two outside Aces.
- You are not vulnerable.
Your legitimate fears:
- The quality of your suit is more than mediocre.
- Your opponents have an overwhelming point majority.
After weighing the pros and the cons, you make the wise decision to pass, and the sequence continues as follows:
| W | N | E | S |
|---|---|---|---|
| 1NT | |||
| Pass | 2♣ | Pass | 2♥ |
| Pass | 4♥ |
West leads the Jack of Diamonds and North lays down his hand:
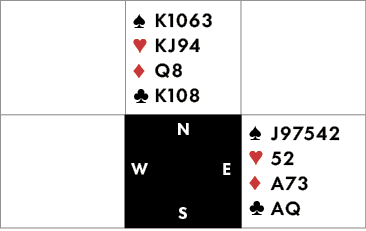
At the sight of the dummy, you congratulate yourself for remaining silent. As expected, you would have found neither support nor points in your partner’s hand! Once this moment of satisfaction is over, you need to focus on the play of the cards. On the lead of the Jack of Diamonds, declarer calls for the 8 from dummy. Now it is your turn: which card will you play?
You may be tempted to duck, to avoid offering declarer two tricks in the suit (the Queen and King)…
You have however all the information you need to produce the best defense:
- The auction – to be precise, declarer’s 1NT opening – leaves no hope for any useful honor in partner’s hand, the Diamond Jack probably being his only point.
- From looking at dummy you can also tell that he does not hold many Spades either (at most one).
You ask yourself: “Why didn’t my partner, who is poor like Job, lead his singleton Spade to try to get a ruff?” The answer then becomes self-evident: “Oh yes, but it is of course… because
he does not have a singleton Spade,
but a void!”
The full deal
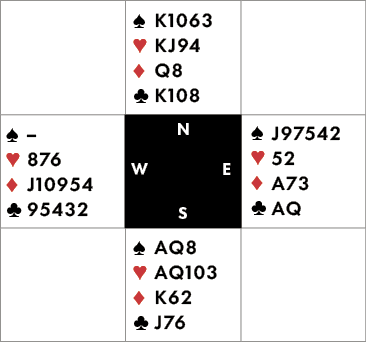
Once this deduction has been made, the defensive plan becomes obvious:
The result:
- You take the first seven tricks for four down and a very nice top!
- The defenders who did not jump up with the Ace of Diamonds at trick one allowed declarer to make. This bad defense gives them a mediocre score.
- The zero goes to a few kamikazes who dared to overcall 2♠, were doubled and went three down!
